Tuesday, May 19, 2015

Childhood Restored -- Part Two: Windows 3.1

About a week or two ago, I was browsing around on the internet, and I came across an article that said it was possible to use DOSBox to install old versions of Windows. I read the article and initially I brushed it off, figuring that the only way to put old OSes on a new PC was VMWare.  Boy, this was a good time to admit that I was wrong.

The first step is to download a program that will UNZIP an ISO file. Now, normally, if one were burning a CD or DVD, the first step would be to use a program like Nero or Disc Juggler. However, seeing as we will be extracting Floppy images, I went with a different piece of software called 'MagicISO,' because it also works with the above type of file, that has extensions such as *.IMG, as well as others.


Once the program is installed, the next step would be to download a set of Windows floppy images (use Google for this). When the images are acquired, then MagicISO can be used to extract them to a directory where a user's DOS games are stored when they start DOSBox.

After the images are extracted, the user can start DOSBox, and mount the C drive to their DOS games directory. From there, use the cd/ command to switch to the directory that you extracted your images to. If all goes well, type SETUP at the prompt and wait for the fun to begin:
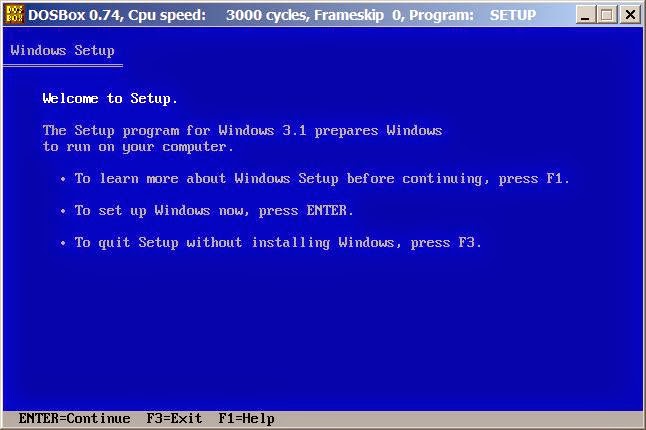

Whether a person chooses Express or Custom Install is entirely up to them. One is obviously for inexperienced and impatient users, whereas the latter is for experienced or meticulous users whom have too much time on their hands. Either way, pick one by pressing the corresponding letter on the keyboard (yes, keyboard--We're not installing Windows 8!) to continue.


Normally, if the user is trying this for the first time, they will not see this screen. However, by the time I took these snapshots, I had already tried this experiment once, and succeeded. Despite that, I did not have the photographic evidence to prove it. Therefore, I had to delete the directory and start from scratch. This caused the installer to assume that I was performing an upgrade. If this occurs, just press enter and let the computer continue installing the OS.


When you do this, the installer will give the user some flack about not doing a clean install, but go ahead and press Enter like it says to continue. Remember that the goal is to get Windows installed without any hiccups.

After the progress bar finishes (which there was no need to get a picture of--we all know what it looks like!, Setup will ask the user for a name to associate with that particular copy of Windows. Just type something in and press continue. This isn't a major issue.


After the registration name is completed, Setup will ask the user whether he or she would prefer to restart the computer, or return to the DOS prompt. Because we are using DOSBox, pick the second option. this will take you back to the C:\>_ prompt that the user initially created when they started DOSBox.


Next type CD\WINDOWS (lower case will do) and then type WIN (again lower case is acceptable). After the Windows splash screen, depending on how the user got their copy of Windows, the interface should look something like the picture below, but the program group items may vary depending on what came with the Install image:


Thursday, May 7, 2015

Everything has an IP address

A few months ago, I walked into a Burger King back home and discovered a new type of soda fountain. There was only one nozzle and a roughly four-inch computer screen that had touch capability. Besides having flavors that I haven't had in forever (such as Cherry Vanilla Dr. Pepper) and new flavors I've never tried (including Vanilla Sprite, which, by the way, was amazing!), it led me to realize that everything we use is slowly having a computer integrated into it.

Since then, I have made an uprooting journey from Ohio to Colorado, and yesterday, I finally tried a new restaurant called "Firehouse Subs" (which coincidentally has Ohio locations) and I came across the same type of machine there as well. Between devices such as this, as well as smart phones, I have come to the conclusion that describes the title of this article.


Saturday, April 11, 2015

How to Make Pixel Art

Making pixel art is simple. First you need an image of a video game. This can be obtained by creating a "screen shot" of a game via a video game emulator, but the easier method is to find a website where someone has done this already, such as The Spriters' Resource.


Once you have found a sprite sheet to work from, pick your image and copy it into MSPaint or another image editing program. If you choose MSPaint, the next step will be to choose the "Stretch/Re-size and Skew" option.


The trick with this is to make sure that you only set the re-sizing options. If you skew the image you are using, not only will it stretch the image, but it will also angle it incorrectly. At any rate, set both of the top attributes to four hundred percent.

Once the attributes are set, you will need to find the original colors from the image, and add three more colors from the NES palette. It contains several different color options to choose from. The best option is to find matching colors of a slightly different hue than the original colors in the picture.


Next, the artist has to edit the picture to change it into a work of art. This is best done with the Pencil tool because it delivers the most precise results. Eventually, depending on the artist's perception, with this example, it should turn out something like the large picture on the left. Again, bear in mind that results may vary. 


Saturday, March 28, 2015

Burn baby, burn!

First off, let me set one thing straight. This is NOT a review for the song "Disco Inferno." As part of an upcoming move, I have been sorting and purging stuff that I do not plan to take with me. Part of this has included elimination of stuff that, quite frankly, I just don't need. Since I acquired a laptop last semester that contains a DVD burner, and I realized that my desktop TV tuner can rip VHS tapes to digital format, I decided to buy some blank DVDs and start creating my digital collection.


To start my process off, I connected an A\V switch box to my desktop using a standard RCA video cable and a headphone to Stereo RCA audio cable. Next, I used a standard RCA A\V cable to connect the A\V switch to the VCR that I would be using to copy my VHS tapes.


Second, I opened my TV tuner software on the desktop. This allowed me to take the physical VHS cassettes and make video files that a computer could read.


Third, I used a utility that is included in Windows Vista/7 called "Windows DVD Maker" to burn my discs. This was another utility that streamlined the process considerably well, with only three steps to its disc creation process.


Once the disc was inside the computer, there was a slight waiting process. Eventually the bar filled up to one hundred percent and the computer decided to return the disc to me.


Eventually, once the disc was finalized, I was able to label it, (and not by the color of its label, but by the content of its characters!) - that is to say, I gave the disc a clever name, and described the video footage contained therein.

Monday, March 9, 2015

Today I lost faith in humanity.

So, I get home from work, and log in to Facebook. Shouldn't be to out of the ordinary, right? Just a typical day, right? Wrong. Anyway I'm browsing through my news feed, when I suddenly notice that Apple is announcing a new MacBook. Naturally, I just brush it off because Apple's hardware life cycle seems to be about the same as any decent Linux distribution (about 6 months). I had also heard about USB 3.1 type C and heard that Apple might be adopting it. Again initially the announcement didn't phase me that much.


I even saw a picture of it and it still didn't phase me that much. Just another Apple product that has had a few more inches shaved off its aluminum body with a lathe, which didn't phase me either (honestly, I could have done that myself in high-school shop class). Oh no, the worst was yet to come. Once I saw how all of one's devices would be connected to it, any convincing that Apple could have done to get me to join them went right out of the window when I saw this:


Yes, that's right. your eyes are not deceiving you. Apple has lost all common decency to make it easy for a person to connect devices to their computers. For a little history: in the old days, when a person bought a computer, IBM compatible machines (or "PCs") were empty boxes that you had to add components to. The advantage that Apple had over their competitors was that everything was right there and you could connect it in minutes, if not seconds, whereas a PC had to be gathered up and connected together either by plug shape (or by color if your computer was a Pentium 3 or newer). They even used to boast about it on their commercials [1].

Now, as I look at the above picture, and realize that Apple is taking a "1980" approach to desktop connectivity (buy PC now, add more later), it leaves me convinced that they have lost any conceivable advantage that might have been previously owned or within their reach.

For more information on what the crap I am referring to, please read this article: http://www.theverge.com/2015/3/9/8177087/macbook-port-adapter-accessory

Friday, February 27, 2015

Portable 3D??? The heck you say!

So, it has been a few weeks since I have acquired the Nintendo 3DS, and overall, my experience with it has been positive and flawless. I was even able to transfer most of my games from the Nintendo DSi, which is more than can be said for my Wii to Wii U upgrade (thanks, GameStop!). At first, having a handheld with bigger screens felt kind of awkward, because I was used to the original-sized Nintendo DSi. Over time, however, I was able to spend time with it and get a feel for how it works, and I have to admit, I am a fan.

The next thing I did was register my device and synchronize it with Club Nintendo in order to get my 160 reward points, and additional reward points for games I download afterward. This was especially crucial because I later found out that the program would be discontinued in a few months and I wanted to get and spend as many points as possible. At the end of the day, I was able to download four game rewards (one was actually the WiiWare version of Punch-Out!) as well as the new version of Flipnote Studio.


I have also tried features I have not been able to experience in the past. Since I acquired the 3DS before I was able to sell or trade the Nintendo DSi, I was finally able to try Pac Man Vs. for the Nintendo DS. This game, while still fun, does not have as much play appeal as its GameCube original, however, it is still a good game.

In addition, I had the opportunity to try the Augmented Realtiy feature that I have heard so much about. As much as I hate to admit it, this feature has probably been the most disappointing. At first glance, the 3D looks amazing, but over time, I realized that without perfect lighting, which entails me setting up a desk lamp on a card table, augmented reality does not work on the Nintendo 3DS because of the lack of a flash cue within the cameras themselves.


Now, that's not to say that the 3DS doesn't have any perks. For example, compared to its predecessor, the 3DS has a lot more to offer in terms of content. Besides the obvious "new release" titles, the one thing the 3DS has going for it that the DSi does not would be a virtual console library. I was able to pick up the first two Mario Land GameBoy games (also through Club Nintendo) and they are quite fun for being over two decades old. At some point I also plan to try one of Nintendo's 3D Classics releases and the one I was most excited about was Urban Champion. However, since that was one of the first Wii U downloads I purchased, I might have to rethink my strategy for this, and I will most likely choose the 3D version of Xevious instead.


All in all, the graphics are improved, although, the type of shading the 3DS uses when the 3D slider is turned up kind of gives me a headache, so I do not use it very often. It's still an excellent handheld console.   

Thursday, January 1, 2015

Childhood Restored....Almost

So, Christmas has come and gone. One of the things that I received this year was a clone of the Sega Genesis. Its height, length, and width are equal to two of the cartridges that it can play. It only has single channel audio, but it comes with two wireless controllers and about 40 or so built-in games.

Now, you might look at me and say, "Geez, that sounds like every plug and play console that they release these days!" Well, I assure you, that there is a huge difference, because not only does it have games pre-loaded on to the console itself, but you can also play the games you still have laying around because Second Time Around wouldn't buy them unless they were in the original casing with the manual.

When I first noticed this particular feature, a couple of things went through my mind. The first was, "Okay, that's not so bad.", and the second was "Hmm. I should find a Sega 32X because I've never owned one before."

All in all, it has been pretty good. Some of the games are more playable than others, such as Sonic the Hedgehog vs. Jewel Master (both of which I own in cartridge form, ironically), and the wireless controllers are nice, as well, because I am not constrained by a cord that could get damaged.

Now, that isn't to say that the console does not have its downsides. When I first tried it out, I tested all of my existing Genesis cartridges to see if they would function and only a fraction of them do. Also, for some reason, it will not recognize when Sonic 3 and Sonic & Knuckles are locked together (even though Sonic & Knuckles is oone of the preloaded games).

All in all though, I would probably give the device a 75% "Yes I would recommend this."

Front of the console, with Sonic 3 inserted.

Back of the console, revealing an A\C adapter port and mono A\V jacks.

One of the two controllers that was included with the console. It is wireless and takes two (2) Triple A (AAA) batteries.
Interface of the Sega Genesis Firecore with a sample picture of Sonic 2.